Turkish lifts are an exercise that came to CrossFit from wrestling. Traditionally, this exercise is performed by sambists and adherents of jujitsu, with a kettlebell. It is used to develop a quick rise in a rack from a lying position. In CrossFit, it can act as an element of WODs, or as an independent movement that develops such a quality as intermuscular coordination.
Benefit
The benefits of Turkish lifts can be judged from the above: it develops coordination of movements, allows you to quickly rise from a knockdown position (which may be relevant in everyday life), works out all the muscles of the core in a dynamic mode, which, in principle, is quite unique. Well, and a huge plus for those who want to lose weight: since all the muscles of the body work, the energy consumption of Turkish lifts is absolutely fantastic.
What muscles work?
In the dynamic mode, when performing Turkish lifts, the leg muscles work, an especially large load falls on the quadriceps and lower leg muscles. The abdominal muscles also work, and both the rectus abdominis and the obliques are equally involved. The serrated muscles on the side of the working hand are also great.

In statics, the triceps muscle of the shoulder, the major and minor pectoral muscles work. The deltoid muscle works in a dynamic mode, especially the anterior and middle bundles, the posterior deltoid stabilizes the shoulder, on a par with the "rotator cuff" - the supraspinatus, infraspinatus, subscapularis, large round muscles, the joint acquires greater resistance to traumatic effects. Direct involvement of the back muscles is minimal and limited to the function of stabilizing the spine and pelvis.
Exercise technique
The technique of Turkish lifts is quite complicated, we will consider it step by step using an example with a classic equipment - a kettlebell.
With kettlebell
Before starting work on the exercise, do a joint warm-up, and also pick up a kettlebell with a low weight to start with, so that you first work out the technique of Turkish lifts.
- Starting position: lying on your back, the kettlebell is in a straightened arm, at 90 degrees to the body, the non-working arm is pressed to the body, legs together. In the first phase of the movement, the non-working hand is retracted from the body at 45 degrees, the leg of the same name with the working hand is bent at the knee joint, placed on the heel - an important point, there must be a distance between the heel and buttock! You do not need to bend the knee more than 45 degrees - this can very easily injure the joint.
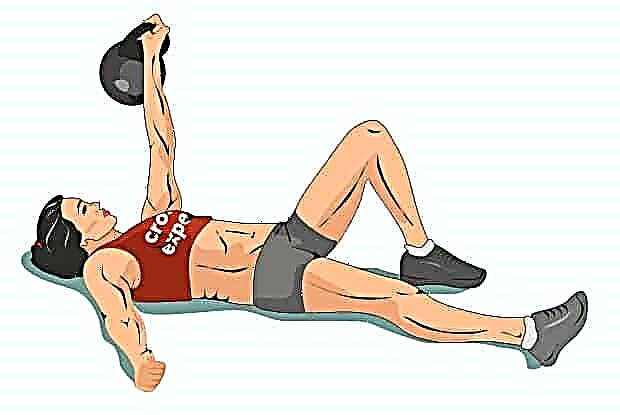
- Holding the hand with a weight above ourselves, we create support on the non-working hand - first on the elbow, then on the palm. With a continuous movement, we push off with the supporting hand from the floor, while simultaneously contracting the abdominal muscles. We do this on exhalation, while the abdominal muscles contract as much as possible, which, firstly, facilitates movement, and secondly, creates powerful support for the spinal column, in particular for the lumbar vertebrae. Thirdly, you need to take the blow on the exhale - if you are learning this exercise with an "applied" purpose, this is important.

- At this stage, the starting position is as follows: sitting, one leg is bent at the knee, the other is straightened, lying on the floor. The arm, opposite to the bent leg, rests on the floor, taking on part of the body weight. The second arm is straightened at the elbow, raised above the head with a weight. We raise the pelvis, we find ourselves on three points of support: the foot, the heel of the leg, which has been straightened, the palm of the supporting hand. With this palm, we push off the floor, create a powerful impulse, transfer the center of gravity to the pelvis, while simultaneously bending the previously straightened leg and taking it back.
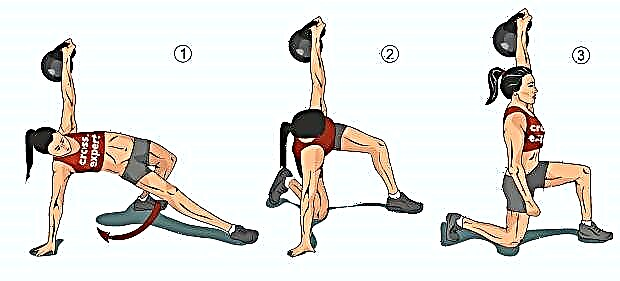
- We find ourselves in an emphasis on the knee and the foot of the second leg, the arm with a weight is fixed above the head. Powerfully straighten the knees and hip joints and stand up, while looking upward in such a way that the spinal extensor is engaged along its entire length, which is very important from the point of view of injury safety of movement.

- Then we lie down in the reverse order - bend our knees, take the pelvis a little back, continuing to hold the weight above our head.
- Move the non-working hand away from the body, gently transfer part of the body weight to it - it is better to touch the floor first with your fingers, then with your palm.
- We straighten the knee of the hand of the same name, lean on the heel, foot, palm.
- In a controlled manner, we lower the pelvis to the floor, straighten the leg at the knee joint, and at the same time lie on the floor - in a controlled manner, keeping the abs and neck muscles in static tension - there is no need to fall uncontrollably to the floor. You do not need to press the supporting hand to the body - you can immediately go to the next repetition.
You need to breathe constantly during the exercise: at each of the listed stages, you need to do one breathing cycle - inhale-exhale, and on exhalation you need to go to the next phase of the movement, while inhaling you can "rest". Holding your breath here is not advisable, so you will only get tired faster.
Exercise Turkish lifting with a kettlebell is difficult to coordinate, respectively, traumatic - before doing it "at speed", master it step by step, first without weight, after - with light weight. The optimal working weight will be a weight of 16-24 kilograms. Having mastered the kettlebells of this weight in the ideal technique, you can move on to performing Turkish lifts with a higher speed and time.
Other types of exercise
Turkish lifting can be performed with a kettlebell, barbell or dumbbells. If the dumbbell option is the easiest possible, then the most difficult option is to lift from the floor with a barbell held on an outstretched arm, since here the muscles of the forearm and hand are most involved. To hold the barbell in the outstretched hand so that none of the ends of the bar is "skewed" is not a trivial task.

To master this version of Turkish lifts, it will be optimal to first master the traditional Turkish lifts, and with a working weight. The next step is to do Turkish body bar lifts - this will train the hand muscles to keep the non-standard projectile in balance. When you can confidently perform the Turkish lift with the bodybar, go to the 10 kilogram bar, have mastered the movement with it, moved on to the Olympic bar. A plus, in this version, will be that having mastered the whole complex from the bodybar to the Olympic bar, you will become the owner of a truly steel grip.


